Variables · Functions · Interpolation · Brace expansions · Loops · Conditional execution · Command substitution · One-page guide to Bash scripting
Source: Bash scripting cheatsheet
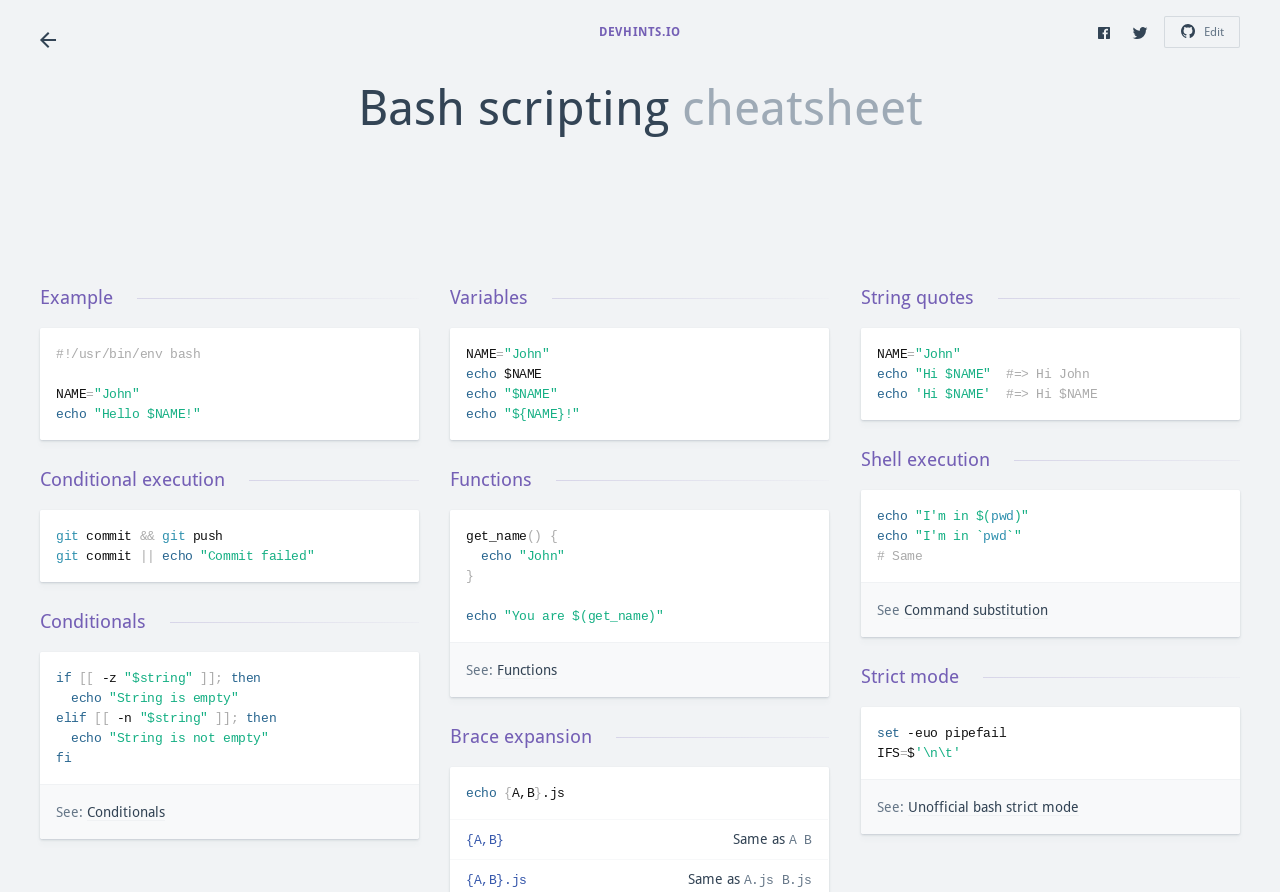
Variables · Functions · Interpolation · Brace expansions · Loops · Conditional execution · Command substitution · One-page guide to Bash scripting
Source: Bash scripting cheatsheet
Here’s a quick HOWTO for setting up an OpenVPN server and client on any (Debian, in this case) Linux machine of your choice. I’m running an OpenVPN server on a box at home, and a client on my laptop, so I can securely route all my laptop traffic through my OpenVPN server, no matter where I am.
I highly recommend reading the official OpenVPN HOWTO from top to bottom, at least once. But here’s a short, condensed HOWTO (specifically geared towards my needs, yours might be different):
Install OpenVPN (apt-get install openvpn), then copy the “easy-rsa” files to /etc/openvpn/easy-rsa from where we’ll use them to create our keys and certificates:
  $ cp -r /usr/share/doc/openvpn/examples/easy-rsa/2.0 /etc/openvpn/easy-rsa
  $ cd /etc/openvpn/easy-rsa
In the vars file change the KEY_SIZE variable from 1024 to 4096 for good measure:
export KEY_SIZE=4096
Then, read in the vars file, clean old keys and certificates (if any) and create new ones:
  $ . ./vars
  $ ./clean-all
  $ ./build-ca
You’ll now have the chance to enter some data such as country code (e.g. “DE”), state/province, locality, organization name, organizational unit name, common name, name, and email address. The values you choose don’t really matter much (except for commonName, maybe, which could be your hostname or domain or such). Finally, the ca.key (root CA key) and ca.crt (root CA certificate) files will be created.
Next, we’ll create the server key:
$ ./build-key-server server
You’ll have to enter lots of info again (see above), commonName could be “server” or such this time. Upon “Sign the certificate? [y/n]” say y, as well as upon “1 out of 1 certificate requests certified, commit? [y/n]”. Finally, the server.key and server.crt files will be created.
Same procedure for creating a client key (I used “client1” as filename and commonName here):
$ ./build-key client1
Next up we’ll generate Diffie Hellman parameters (this will take a shitload of time due to keysize=4096, go drink some coffee):
$ ./build-dh
When this step is done, you’ll have a dh4096.pem file.
As we want to use OpenVPN’s “tls-auth” feature for perfect forward secrecy (it “adds an additional HMAC signature to all SSL/TLS handshake packets for integrity verification”), we’ll have to generate a shared secret:
  $ openvpn --genkey --secret ta.key
  $ mv ta.key keys
So much for creating keys. Now, we’ll have to configure OpenVPN. Copy the default server config file and edit it:
  $ cd /etc/openvpn
  $ cp /usr/share/doc/openvpn/examples/sample-config-files/server.conf.gz .
  $ gunzip server.conf.gz
The most important change in my setup is that I use port 443/TCP instead of the usual OpenVPN default of 1194/UDP. This increases the chances that you’ll be able to use OpenVPN in almost all places, even in environments which firewall/block lots of stuff. Port 443/TCP (for https) will almost always be usable. I also uncommented the following line, which tells the client to use the VPN interface (usually tun0) per default, so that all the client’s traffic (web browsing, DNS, and so on) goes over the VPN:
push "redirect-gateway def1 bypass-dhcp"
Here’s my server config file (comments and commented out lines stripped):
  port 443
  proto tcp
  dev tun
  ca /etc/openvpn/easy-rsa/keys/ca.crt
  cert /etc/openvpn/easy-rsa/keys/server.crt
  key /etc/openvpn/easy-rsa/keys/server.key  # This file should be kept secret
  dh /etc/openvpn/easy-rsa/keys/dh4096.pem
  server 10.8.0.0 255.255.255.0
  ifconfig-pool-persist ipp.txt
  push "redirect-gateway def1 bypass-dhcp"
  keepalive 10 120
  tls-auth /etc/openvpn/easy-rsa/keys/ta.key 0 # This file is secret
  comp-lzo
  user nobody
  group nogroup
  persist-key
  persist-tun
  status openvpn-status.log
  log-append openvpn.log
  verb 3
You can now start the OpenVPN server, e.g. via
$ /etc/init.d/openvpn restart
I’m running a custom iptables script on pretty much all of my boxes. Here’s the relevant changes needed to allow the OpenVPN server to work properly. Basically, you need to enable IP forwarding, accept/forward tun0 traffic and setup masquerading (change “eth0” below, if needed):
  echo 1 > /proc/sys/net/ipv4/ip_forward
  iptables -A INPUT -i tun+ -j ACCEPT
  iptables -A FORWARD -i tun+ -j ACCEPT
  iptables -A FORWARD -m state --state ESTABLISHED,RELATED -j ACCEPT
  iptables -t nat -F POSTROUTING
  iptables -t nat -A POSTROUTING -s 10.8.0.0/24 -o eth0 -j MASQUERADE
My firewall script gets run upon every reboot. If you don’t use such a script, you could add the above stuff to your /etc/rc.local file.
Install OpenVPN (apt-get install openvpn), then copy the default client config file and edit it:
  $ cd /etc/openvpn
  $ cp /usr/share/doc/openvpn/examples/sample-config-files/client.conf .
Change the parameters to match the server config (port 443/TCP, and so on) and use “tls-auth /etc/openvpn/ta.key 1” (note the “1” on the client, and the “0” on the server!). Replace xxx.xxx.xxx.xxx with the public IP address of your OpenVPN server. If it doesn’t have a public, static IP address already, you can use services such as DynDNS, or (my preferred method), my ssh-based DIY poor man’s dynamic DNS setup.
Here’s my full client config:
  client
  dev tun
  proto tcp
  remote xxx.xxx.xxx.xxx 443
  resolv-retry infinite
  nobind
  user nobody
  group nogroup
  persist-key
  ca /etc/openvpn/ca.crt
  cert /etc/openvpn/client1.crt
  key /etc/openvpn/client1.key
  ns-cert-type server
  tls-auth /etc/openvpn/ta.key 1
  comp-lzo
  verb 3
Now you only need to copy the required certificates and keys to the client (into /etc/openvpn): ca.crt, and ta.key. Do not copy the other, server-specific private keys and such to the client(s)! Also, the root CA key (ca.key) should not even be left on the server, but rather moved to some offline storage/box, so that it cannot fall into the wrong hands, e.g. in the case of a server compromise.
I prefer to manually start the client on my laptop when needed, so I use AUTOSTART=”none” in /etc/default/openvpn and then start the client via:
$ openvpn /etc/openvpn/client.conf
That’s it. Comments and suggestions for improving the setup and/or the security aspects of it are highly welcome!
 I have written about using lossless optimisations techniques to reduce the size of images before, but I recently learned of a few other tools to further reduce the size of PNG images.
While you could use Smush.it to manually optimise your images, if you want a single Open Source tool you can use in your scripts, optipng is the most effective one:
optipng -o9 image.png
While not as effective as optipng in its basic optimisation mode, pngcrush can be used remove unnecessary chunks from PNG files:
pngcrush -q -rem gAMA -rem alla -rem text image.png image.crushed.png
Depending on the software used to produce the original PNG file, this can yield significant savings so I usually start with this.
When optimising images uploaded by users, it’s not possible to know whether or not the palette size can be reduced without too much quality degradation. On the other hand, if you are optimising your own images, it might be worth trying this lossy optimisation technique.
For example, this image went from 7.2 kB to 5.2 kB after running it through pngnq:
pngnq -f -n 32 -s 3 image.png
Most PNG writers use zlib to compress the final output but it turns out that there are better algorithms to do this.
Using AdvanceCOMP I was able to bring the same image as above from 5.1kB to 4.6kB:
advpng -z -4 image.png
Another thing I noticed while optimising PNG files is that rendering a PNG of the right size straight from an SVG file produces a smaller result than exporting a large PNG from that same SVG and then resizing the PNG to smaller sizes.
Here’s how you can use Inkscape to generate an 80×80 PNG:
inkscape --without-gui --export-width=80 --export-height=80 --export-png=80.png image.svg